Easy Costumes: the Simple Shirt

Last blog I wrote about the financial challenge costuming can be and mentioned that I was going to do a series on inexpensive costuming. Here, in Part 1, I give you: the Simple Shirt.

What you’ll need:

Thank you, amazon.com for the image


1. A collared dress shirt, preferably in a solid color that fits the time period (no neons or pastels). Look for black, white, off white, dark blue, red, dark purple, dark green, brown or dark grey. In my opinion those are the best color choices for immersion. For size I recommend you obtain one that’s too big for you. The look and feel of the day was far baggier than what we find comfortable by most modern standards. Also, a larger shirt is less restrictive when you’re sword fighting. Lucky for you, shirts like the one above can be found at almost every thrift store in existence as well as most garage sales, attics and the dusty backside of closets. Especially for the ladies: try to get one that hangs down to about mid-thigh or a little longer so that you can belt it without it constantly untucking itself from your movements.

Things to avoid: patterns and pockets. We’re going for simple and immersive here. Avoid polo shirts. They’re incredibly not time period and there’s really nothing you can do to make them immersive. Avoid stretchy materials. They’re hot and uncomfortable to wear over a full weekend of athletic activity.

2. A seam ripper.

3. A pencil

4. A decent pair of scissors.

5. A length of leather lacing. Here’s where the expense comes in. You’ll probably have to buy a roll of leather lacing from the craft section of Walmart or you’ll have to get it at your local craft store. You can also order them on the internet. A friend of mine opts for the boot laces instead of getting it on a roll like I do. Here’s what it looks like:

image courtesy of amazon.com

Here’s the Amazon link to this particular item because if you try to use the search bar you’re bound to wind up with all sorts of interesting pictures that you don’t necessarily want to see. http://www.amazon.com/Genuine-Split-Suede-Leather-Black/dp/B001NW2QQA/ref=sr_1_51?s=arts-crafts&ie=UTF8&qid=1369865718&sr=1-51&keywords=craft+leather I’m pretty pleasantly shocked by the price of this. In store prices are significantly higher.


Now that you have your materials together. Here’s what you want to do.

1. If you hate the way the collar looks (some collars are too skinny, some button down onto the shirt, or you’re like me and just hate collars in general), then use your scissors and cut it off.
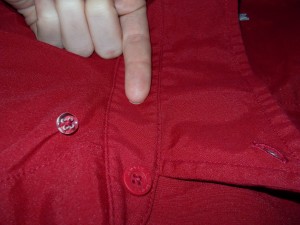
I recommend you keep the part my finger is on and cut to the right of the seam that is to the right of my finger. You'll have what is called a "mandarin collar" left.

I recommend you keep the part my finger is on and cut to the right of the seam that is to the right of my finger. You’ll have what is called a “mandarin collar” left.

This shirt is by no means expected to last you 20 years, so I’m not going to have you “finish” any of it. Finishing work is meant to prevent the material from fraying and ripping, but it takes a knowledge of sewing that is beyond what this tutorial is designed for. The area where you cut the collar from might fray some, which in my opinion just adds authenticity to any adventurer’s outfit, but because you left the seam to the right of my finger intact it will not rip easily. If you’re playing an aristocratic or rich character, you might want to just find a shirt you like the collar on already.

2. Take your seam ripper and pop the buttons off the front of the shirt. You want to slide the inside of the curve under the button and gently, but firmly, push against the threads. The blade on the inside of the curve will slice through the threads and the button should pull free. Then pick out the threads and use your pencil to mark a spot on the shirt where the threads came from. Repeat until all the buttons are off the front of the shirt. (If your shirt had buttons to button down the collar, just take the buttons off and remove the threads. Don’t mark these with the pencil.)

3. Now you’ll be using the long pointy side of your seam ripper. Place that point on the mark you just made with your pencil and push the point through the fabric. Wiggle the seam ripper around until you’ve created a hole large enough to fit your leather lacing through. Do this for every pencil mark on the front of the shirt.

4. Starting at the bottom of your shirt, thread the leather lacing through the button holes and the holes you just ripped in the same way you would lace up your shoes.

Congratulations! You now have a Simple Shirt. If you don’t want to lace it up every time you put the shirt on, just pull the shirt over your head to wear it.
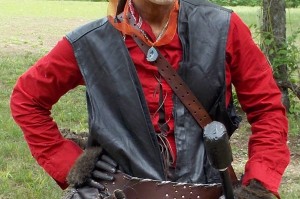
You'll notice here that I lace my shirt down, not up, in order to avoid it getting caught on my armor. I also removed the buttons from my sleeve cuffs to give the sleeves a more open swashbuckling appearance.

You’ll notice here that I lace my shirt down, not up, in order to avoid it getting caught on my armor. I also removed the buttons from my sleeve cuffs to give the sleeves a more open swashbuckling appearance.

SPECIAL NOTE: Most leather doesn’t react well to being washed, especially if it’s dyed to a color. I recommend you remove your lacing before you wash the shirt to avoid any dye seeping onto your costume or wrecking the lacing itself.

Some variations:

VarI: Go sleeveless! Cut the sleeves off the shirt with the scissors. Be sure you cut on the sleeve side of the shoulder seam to prevent the shirt from ridiculous fraying and potential ripping.

VarII: Using a T-shirt instead of a dress shirt is possible, but not as immersive. Cut the collar from the shirt with your scissors and cut a line straight down the center front to the desired depth. Most people prefer to end this cut just above the bottom of the pectoral muscles when the shirt is being worn. Use the seam ripper to create holes across from each other (like on a shoe) and lace the leather through. I highly recommend going sleeveless if using this method.

I’d love to hear from you if you try out this tutorial. Tell me how it went in the comments below!

Inexpensive costuming

A marmot character. Photobomb courtesy of Gizmo.

A marmot character. Photobomb courtesy of Gizmo.

So what better way could there possibly be to spend your Memorial Day weekend than gaming in someone else’s chapter? So that’s exactly what we did. Dustin and I packed up the dog and a short list of gear and we headed out to Tecumseh, KS to play The Edge of the Wilds with Heroic Central. It was a really interesting experience as this game capitalizes on a tribal element that you don’t usually see in high fantasy games. And there were ticks. Lots of ticks.


So while I was up there I was amazed by the youthfulness of the Central player base and it got me to thinking. When you’re young you really don’t have a lot of cash to throw at your costumes. The above costume is roughly as follows:

turban: $6

red shirt: $8

blue pants: $12

boots: $15

black leather armor: $3.50

belt: $3

belt pouch: $2

shoulder bag: $5

furry gloves and tail: $8

paint: $6

foundation: $7

brushes for applying paint: $5

TOTAL: $80.50

You show that number to a high schooler and they’re going to explode with OMGs. This is just the price for the costume. it doesn’t include the price of the event, the Heroic membership fee that gets you insurance during the event as well as other extremely helpful doodads or the price of food during the event.

Now I’m really going to blow your mind. My costume was EXTREMELY inexpensive for the look I achieved. It could have been more inexpensive, however I hadn’t quite yet discovered the local thrift shops when I purchased the red shirt and the pants… and if I was able to sacrifice a stuffed animal for the fur. *shudder* I just can’t do it. It looks at me while I’m trying to rip the seams and makes me want to cry. Velveteen rabbit, anyone?

Now lets make it more accessible to the regular human being. My red shirt, blue pants, shoulder bag and boots were all purchased over a year ago for another character. They were just sitting around my house. My belt and belt pouch were also purchased for yet another character and were just sitting around my house. The turban is a length of fabric I purchased 10 years ago as a makeshift table cloth. The glove pieces under the fur on my hands were originally skeleton hands from a ruined Halloween costume we’d purchased to make packets out of. I paint as a hobby, so all the paint and brushes were sitting around my house. The black leather armor is a leather jacket my husband found months ago and picked up because it was stupid cheap at a thrift store and he figured we’d use it eventually for the leather in it.

For this specific character, I spent $15 and a reasonable amount of time for a pretty kick ass costume. Most high schoolers can scrounge up $15. If you don’t do something that requires the unique foundation/paint mix that I use, you could spend less than $10. Here’s how.

1. Check your closet, your mom and dad’s closets, your grandparent’s closets, aunts, uncles, cousins, siblings, best friends, garage sales, thrift stores, consignment shops, and talk to anyone you know that’s been doing costuming for a while. There’s likely a bunch of things just lying around that you can repurpose into your costume. Always start with the stuff that’s free to see if there’s something that might work. Another great way to save money is to hit costume shops during the off season or check into those “only open for Halloween” shops a week or so after Halloween is over and they’re trying to clear out their inventory before they close.

2. Learn to use one of these:

Thanks to Amazon.com for the picture

This is a seam ripper and if you’re trying to save money on costuming, it’s your best friend. My leather armor was a leather jacket that came to my knees. I used a seam ripper to take everything off it but the vest portion that I wanted. To avoid overheating issues I removed the lining (also with a seam ripper). Then I put it on and stuck a belt over it to hold it closed. The end. Easy cheesey. Just don’t stab yourself with the ripper. It hurts. A lot.

3. Learn to view every sheet, curtain, tablecloth, old couch or cushy chair, prom dress, coctail dress, ruined leather anything, blanket and comforter as a potential costume. My husband’s shiny mage shirt was a women’s plus sized dress shirt before I took a seam ripper and a sewing machine to it. His one shouldered monk robe was a women’s satin bathrobe with lace on it.

4. Learn how to sew on a button. It’s inexpensive, relatively easy to learn to do well and incredibly necessary when you’re learning to reclaim items into costumes.

5. Reassure yourself as you look at this weird jumble of stuff you’ve collected that costumes evolve over time. As interactive theater players or larpers, we have the privilege of wearing this outfit more than once and there’s nothing wrong with changing it up as you go. In fact, this is completely normal.

There’s the basics. As I continue blogging with my costuming how-to stuff I’ll be including ways to skimp on the cost while still providing a really amazing looking result. Stay tuned!


*please note the boffer weapon I carry is not included in this as I consider weapons/shields a separate crafting category. If you’re curious, my boffer is worth about $15-20? I didn’t build it so I’m not sure exactly.

Phys Rep Wings

Wings are ridiculously fun to wear and a huge asset to any cosplayer’s closet, but they’re so expensive! The wings I was wearing during my recent encounter with a marauding car cost me almost 30 bucks. I’m so glad it only knocked one feather loose!

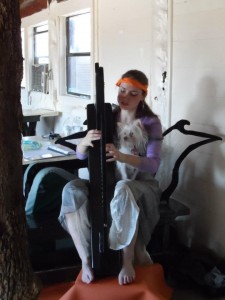
Winter harping with Gizmo, the celestial dog.

Winter harping with Gizmo, the celestial dog.

With the economy the way it is we’re all looking for ways to save a buck and a lot of us are turning to those handy DIY tutorials all over Pinterest and Youtube. We get so excited because we think we can finally save ourselves money (which we don’t have) by investing a little time (which we have plenty of). Unfortunately, sometimes things go sour. Sometimes that awesome looking tutorial lets us down. Here’s a review of one of those moments.

IMG_20130315_090632

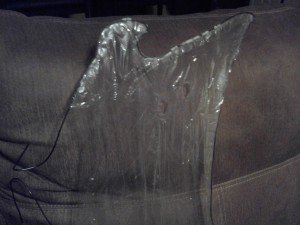
This is the first set of wings constructed for my Tavern Bard, Winter. Winter plays the harp during tavern on weekend events for Heroic North Texas and I thought it’d be really cool to construct wings that have a harpish look to them. Then, when I played, there’d be my harp in front of me with a harp echo behind me. It’d be visually stunning! It’d be so amazing. I was sold on the idea and scoured the internet for about 3 hours looking for just the right tutorial.

Of course, I found the pantyhose over wire hangar tutorials and a couple cloth tutorials (this one is admittedly quite awesome for a basic idea that I might tweak later), but they weren’t going to help with my harp idea. Then I was pleasantly surprised by http://www.instructables.com/id/How-to-make-Cellophane-Wings/. While the idea itself is sound, the application phase was quite lacking. This girl’s rep test had to have been at some tame party where everyone just stands around and admires each other.

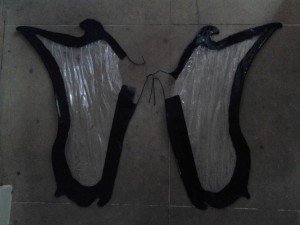
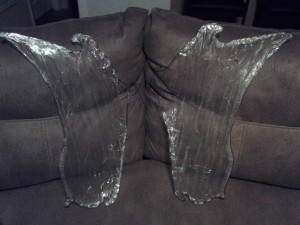
Winter debuted in March of 2013 with her beautifully constructed wings. Time spent on them: close to 15 hours.

IMG_20130305_002639

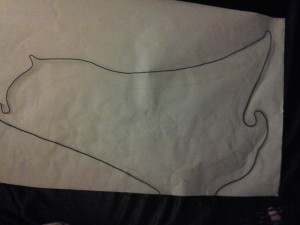
 I followed the tutorial except that I did an all around design for my wire, fully outlining the wing shape.
I then added tiny wires to represent the harp strings, using florist tape and liquid super glue to secure them firmly to their positions on the wire frame until I could do the covering and taping required by the game to keep my wires from poking out an eye. Wiring was extremely time consuming.

The next step is to add the cellophane. You know that spray glue she recommends? It doesn’t dry clear. I ended up with a frothy/filmy pattern all over the wings. It doesn’t matter so much on hers because they’re colored. Mine were supposed to be perfectly clear! The froth also obscured the wire harp string design I’d already worked so hard to do! I was disappointed, but I thought my design was still pretty stellar and I was running close to my deadline so I continued.

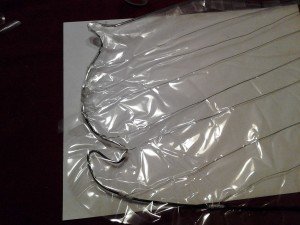
Cellophane is on. Now you can seal off the edges (I used my liquid super glue instead of hot glue because it’s faster and less dangerous at 3am) and shrink wrap the cellophane onto your frame.

IMG_20130313_231908

 Cool! I managed to do the shrink wrapping without burning myself (which is impressive that late at night with a tool you’ve  never used before that’s applying serious heat to a meltable substance), and I only got distracted enough to burn a couple holes straight through. Winter is a battlemage anyway, so the holes just add authenticity, right?

IMG_20130314_011859

IMG_20130314_011829


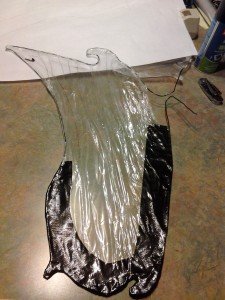
Then you’re supposed to refine your shape. Here’s where I got ingenious. I build boffer weapons with my husband so I’ve got a pretty good grasp on artistic taping. My black frame outline, inspired by actual butterfly wing patterns, is done completely in duck tape.

IMG_20130315_011045

If you’ve never tried to tape a curve with duck tape before, you can’t really understand why, but it took 4 hours to tape the wings. After I was on site and wearing them, I realized I’d actually missed a couple of spots after all that, but they were too small to be noticed. I finished them the morning I had to leave for my weekend event. And boy was I tired.

The wing harness was my own design because the way people usually wear wings is either a great way to cut off your circulation to your arms or it’s never going to stay put in a stiff breeze, let alone a battle. Thankfully, that weekend I was non-combatant so no one was allowed to swing a sword at me, or the whole thing could have been a total disaster. I got the wings secured into my harness, which is specially designed to keep the wings at a nice 45 degree angle from my back and STAY THERE, and proudly stepped out of my cabin to meet the first wind test. The wings immediately buckled. A friend assisted me in getting them straightened out again and I proceeded to the tavern. On the way they buckled again and slid out of the harness on the bottom. *sigh* I spent the rest of the weekend asking people to assist me in getting the wings straightened out and stuffed back into the harness. I have decided these were the phys reps from HELL.

Here’s where I think it all went wrong.

1. She says she usually uses 12 gauge wire for her wings. I think she’s crazy. After the breeze, which wasn’t very strong, and getting bumped into at tavern the 12 gauge wire was all kinds of kinked and messed up. I got it home and reinforced it with coat hanger wire. Even then, the 12 gauge wasn’t doing it’s job and they’re a kinked up mess again. All that work and they’re really not salvageable.

2. Spray adhesive doesn’t dry clear. That’s really good to know. I think next time I’ll drop in some iridescent glitter or maybe just use colored cellophane to offset this problem. maybe I won’t try to stick them together at all, just bond them to the wires with the glue and shrink.

3. Practice with a heat gun is invaluable. It only takes a blink of distraction, literally, to add a hole to your design. And my mother used to shrink wrap professionally, so it’s not like I’m clueless here on how it’s done. I used to stand and watch her, so I know how to tell the plastic is heated enough and it’s about to shrink and when it’s about to tear.

4. The black taping was beautiful, but time consuming and it’s already peeling after 3 wears. Maybe sticking closer to her design in this matter would be better, but I’m concerned still about the safety of having those wires just hanging out there in a battle.

Conclusion: I’ve decided to redesign my wings completely. My next weekend event in May will require me to have a set of wings for Winter and a set of wings for my Pegasus debut. I’m considering doing an armored set of wings instead because the materials used would be far sturdier than the stuff I originally used and it will require far less feathers if most of the top of the Pegasus wings is armored.

Have a DIY wing story or idea you want to share? Leave me a comment below!